Docker Primer
Installation
Linux
Follow the instructions here for your distribution, I strongly recommend using the server instructions and not using Docker Desktop. I’ll explain further down below why that is.
Windows/OSX
You’ll want to grab Docker Desktop for these systems as they don’t natively support Docker. Don’t worry though, you’ll still have a mostly good experience using Docker Desktop.
You’ll be ready to continue on once you can do this:
$ docker --version
Docker version 24.0.5, build ced0996
Mental Models
I think it’s important to have a rough understanding how Docker Desktop works and how it’s different from what you’ll run on your server. Also why you may hit things like out of memory issues when you still have lots of RAM left on your shiny Mac.
Let’s start with the Linux mental map, you’ll see here that regular processes and containers are running along beside each other. This is because a virtual machine isn’t required, Linux natively supports everything required to use runc. This means all your hardware resources are available to the docker containers.
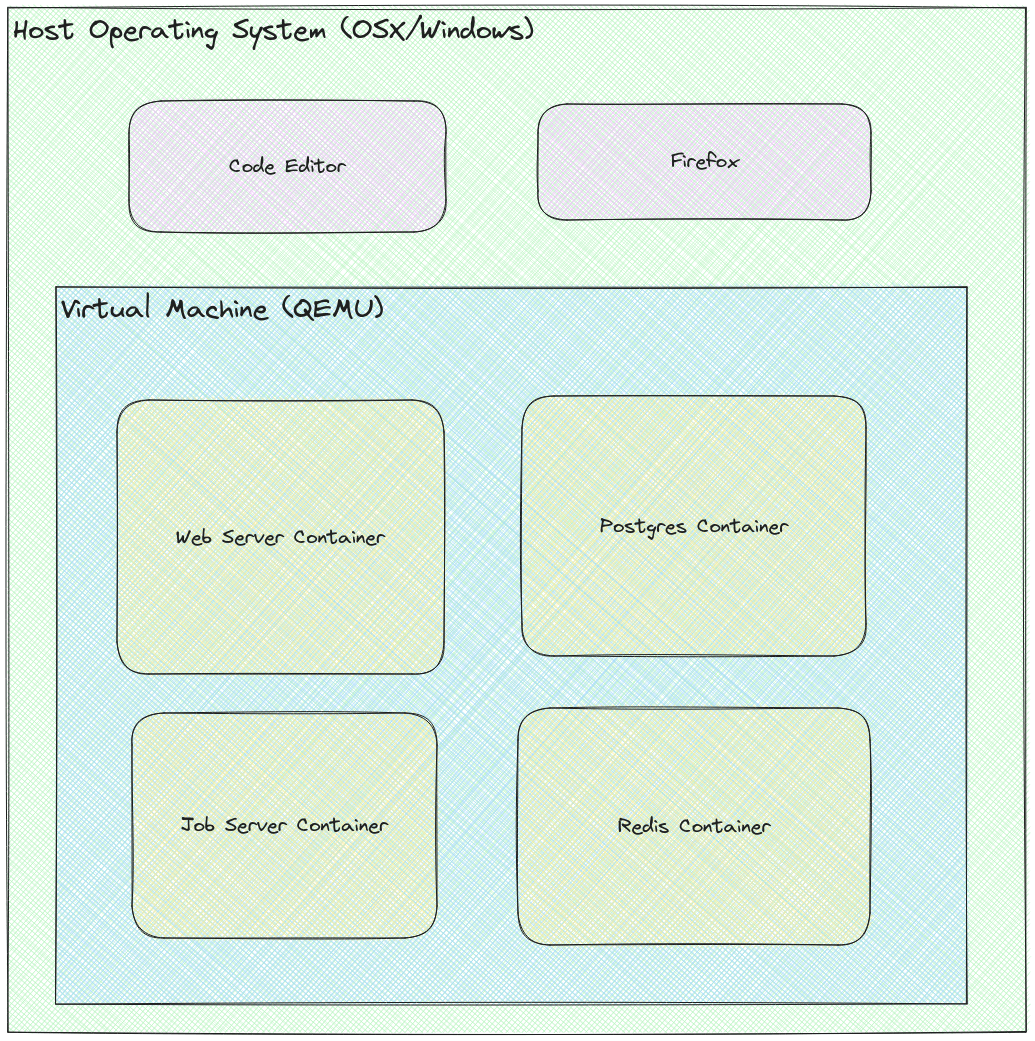
Here with have the mental map for Docker Desktop on OSX or Windows (or Linux if you install Docker Desktop). You’ll notice that there’s a QEMU virtual machine running. This means that there’s actually a Linux system running on your computer that’s a very thin layer to run your docker containers.
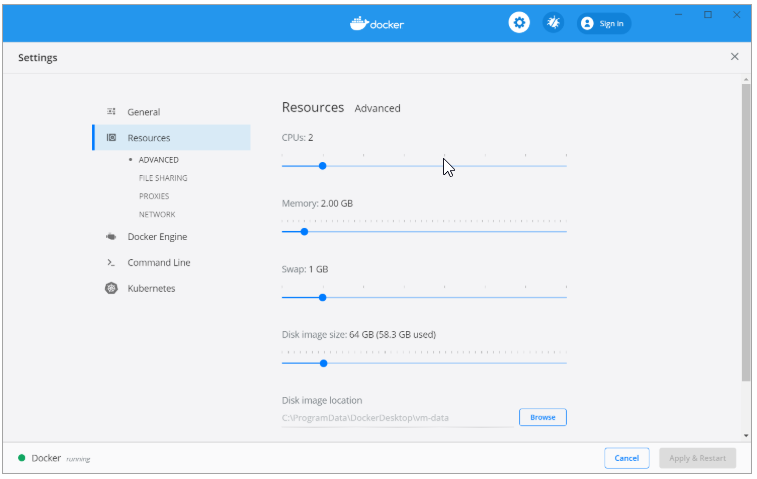
I think it’s important to know this because you can hit issues in your containers like running out of memory or disk space despite your computer having a lot left over. Thankfully you can manage the virtual machine in the settings. Keep in mind that the RAM you allocate will be fully allocated to the virtual machine and you won’t get it back until you stop docker, so choose wisely.
Basic Usage
If you open up two different terminals we’ll have a little play to learn how the basic commands work. We’ll call them Terminal 1 and Terminal 2, very creative names.
In Terminal 1 run docker run --interactive --tty debian bash. This will
download and run a Debian container and give you a command prompt in it.
--interactive means it will give you control of the command, and --tty will
tell the container to assume it’s attached to an actual TTY. In the following
examples I’ll use -it which is short for --interactive --tty. You can do all
the usual things like apt-get install vim-tiny, top, cat /dev/urandom,
etc. But what did we actually just do? This started a new container and ran the
command you specified. If you specified no command it would run the default one
provided by it’s docker file.
In Terminal 2 run docker ps and you should see a line that looks like:
CONTAINER ID   IMAGE     COMMAND   CREATED        STATUS                  PORTS NAMES
69be379db86d   debian    "bash"    1 second ago   Up Less than a second blissful_northcutt
This is useful for seeing what docker containers are running on your system as usually they’ll be daemonised. This also gives you the ID for the container which is useful for the following commands.
In Terminal 2 run docker exec -it 69be bash (where 69be is the first few
characters of the ID you got from the docker ps command) and you’ll be greeted
by a new prompt. What we’ve done here is connect to the previously started
container, so there’s still only one container running on your machine. Also,
the reason we only had to pass the first few characters of the ID is because if
it’s unique enough, docker will be able to figure out which container to connect
to, but if you had two containers running, say with IDs abcd and abdd you
wouldn’t be able to type just docker exec -it ab bash because it wouldn’t be
able to figure out which docker container you meant. Type exit to get out of
that container.
In Terminal 2 run docker stop 69be and you’ll see that in Terminal 1 after a
few seconds it’ll shut down your container.
Sometimes you’ll find that docker stop isn’t able to shut down the container
due to a hung process, for that we have docker kill 69be which works a lot
like the kill command. This will more aggressively terminate the running
container.
Basic Dockerfile
Let’s create our first Dockerfile! We’ll start with a very basic ruby server serving a single html file.
FROM ruby:3

WORKDIR /app

RUN gem install webrick && \
echo 'Hello there!' > index.html

CMD ruby -run -e httpd . --port 3000
In the same directory we can run docker build . -t our-cool-image. Once that’s
finished we can run docker run -p 3000:3000 our-cool-image. You should see a
bit of output like:
[2023-08-15 14:36:49] INFO  WEBrick 1.8.1
[2023-08-15 14:36:49] INFO  ruby 3.2.2 (2023-03-30) [x86_64-linux]
[2023-08-15 14:36:49] INFO  WEBrick::HTTPServer#start: pid=7 port=3000
[2023-08-15 14:36:49] INFO  To access this server, open this URL in a browser:
[2023-08-15 14:36:49] INFO      http://127.0.0.1:3000
You will now be able to access http://localhost:3000 in your browser and you
should see Hello there!
Some Gotchas
You’ll notice in the previous example I’m using FROM ruby:3 what this means is
to download the docker image that is tagged ruby:3. You may think this is like
a git tag which points at a specific commit and you’d be kind of right. Yes, it
does point at a specific built image, but unlike a git tag it updates, and not
just a little, quite a lot. Images are updated for security changes, OS
upgrades, and even ruby version upgrades. You’ll notice that I used ruby:3,
currently this points to ruby 3.2.2 but when ruby 3.2.3 releases it’ll change to
that. This can surprise people because suddenly gems with native extensions may
start failing to build, or nginx configs may fail to load, etc.
Another gotcha is that when this is run on modern Macs you`ll actually be using ARM64 images, which don’t always match the x86_64 versions as closely as they should. Especially when you start to get to more niche images. Some images also just don’t support ARM64 and will download the x86_64 versions and run them in a compatibility layer.
Alpine promises small disk images but has the big gotcha of using libmusl instead of glibc. If this means nothing to you then you shoud be extra afraid, because when you hit an incompatability you’ll be even more confused and have a harder time debugging it.


